Bunse's Green Drake

One hot early summer afternoon in June I found myself perplexed, questioning if I’d made the mistake of spending the afternoon on the Metolius hunting for wild rainbows. The hatch of Drakes was small since the sun had been present most of the day and PM’s were nowhere to be found. Fierce rain showers and thunderstorms occasionally passed overhead, making one wielding a graphite pole wary. As I turn my back to leave my hole, a noise arises that I’ve heard before. It was not the general rustling of the water nor was it the splash of my boots from below. I was certain a rise happened somewhere behind me. I casually faced the river and waited, until it proved me right, yet again a second rise only feet from me. I remove the fly from my hook keeper striped out my line and cast. First cast, nothing. On the second cast the fly drifted slowly. At first there was nothing, and then there was chaos. The biggest trout I’ve ever hooked engulfed the entire fly. After the fish made a few good leaps and doing anything in its power to throw the hook from its mouth. Yet I persisted and landed the leviathan. All of this excitement happened thanks to the best Green Drake pattern I know.
This fly has become my trusty go to for Green Drakes. It was a gift from a true friend. This pattern is tricky. Expect that it will take time to master it. I hope all who fish, enjoy this pattern as much as I do. If you want to learn the ins and outs of tying this pattern, catch me at the shop this Saturday at 10:00 AM. I will also present a slideshow focusing on fishing the Metolius River with a dry fly.
Hook: Daiichi 1160 size 12
Thread: Yellow 70 denier
Body: 2mm olive foam
Tail: Two moose body hairs
Wing: Natural comparadun deer hair
1. Cut the colored foam into a kite shape approximately three full hook shank lengths long by one hook wide
2. Mount a beading needle by its eye in your vise. Start the thread lightly near the needle’s center. Tie in the tip connecting the longest sides of the foam on the needle (the rest of the foam should be back towards the vice). Use light thread-tension throughout the needle tying part.
3. A tiny hump of foam should project beyond the thread turns. Hold one tail hair on each side of the foam, take a light turn around both, pull the turn snug enough to spread the tails. The tails should project about 2 shank-lengths from their tie-in point, but this is not critical. Do not trim the tail’s butt.
4. Wrap to create a three or four piece segmented extended body by wrapping away from the vice then pulling the foam between the tails and securing with 7-10 wraps. Noted to pinch foam into a u shape around needle. Then whip finish and use fingers nails gripped at the end of the tail (where the moose hair is) to slide the extended body off the needle. Head cement wraps from the top.
5. On the hook, tie in a quarter pencil size of deer hair with tips facing towards the eye at about a third of the shank length back from the eye (end resulting wing should be about a shank length tall). Cut the butts at an angle and secure hair. Make sure tye the hair on top of the hook.
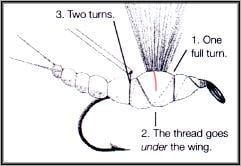
6. Thread hook though foam, tie back deer hair and secure foam behind eye follow the wraps in picture provided. Create a half moon shape out of the hair by pulling hair down into the cut slit which will pinch it in place (the cuts are the red lines on picture). Secure tip of the foam with a couple more wraps and whip finish. Add head cement to add the bombproof factor.
Leave a comment
Recent articles
View all
Life After Salmonflies
Cold Water Refuge